Revit Trim Wall To The Slope Of A Roof

Slope Wall Attach To Roof Autodesk Community

Slop Bottom Of Wall Autodesk Community Revit Products

How To Modify The Side Contour Of A Wall Architecture Program New Surface Roof Beam

Wall By Face Part 2 Creating A Slanted Wall Tool Wall Create Face
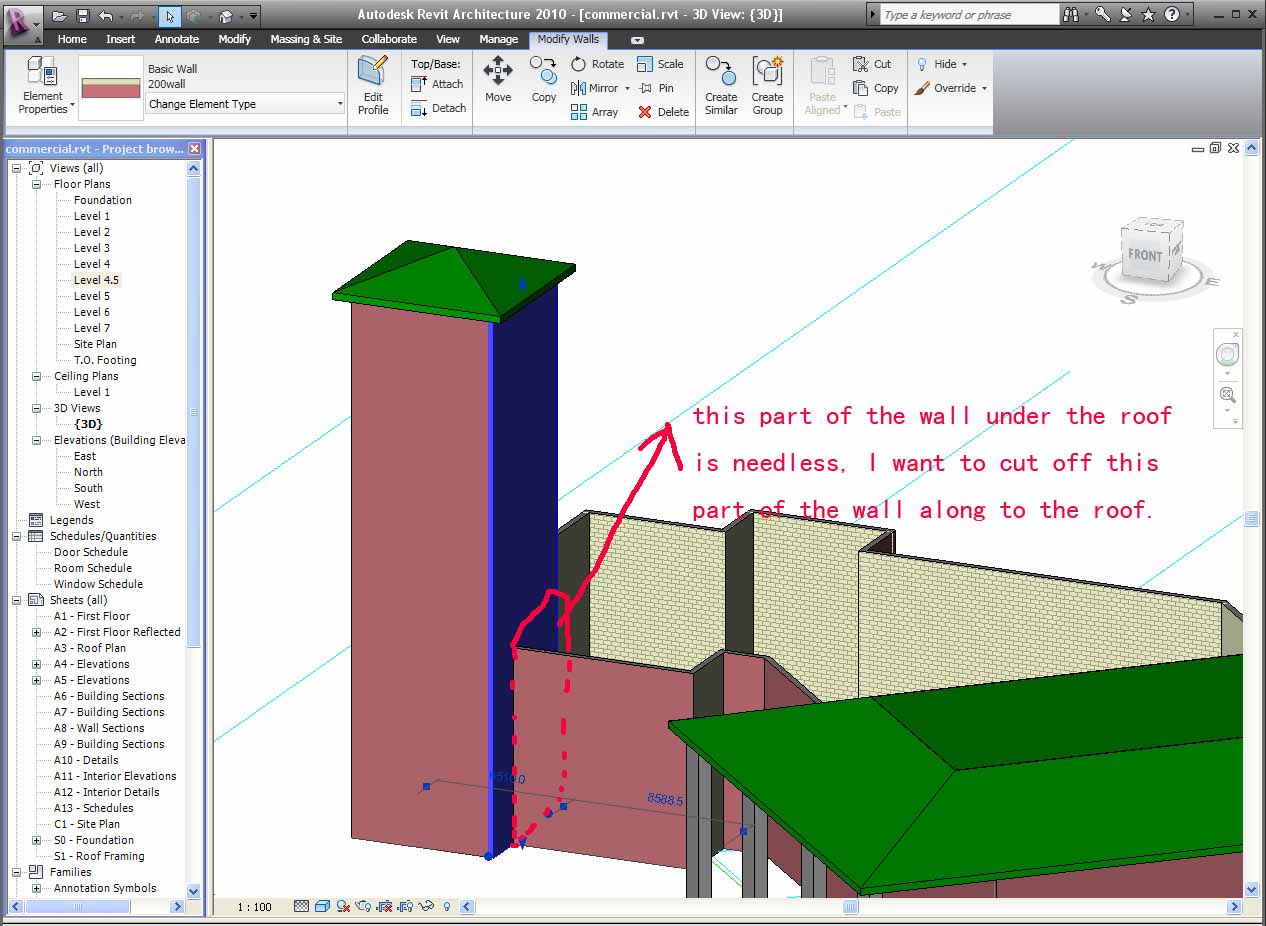
Revitcity Com How To Cut The Wall Along The Roof

Drawing A Dormer In Revit Dormers Drawings Future House

Repeat for the north.
Revit trim wall to the slope of a roof. Repeat for the north. To create a sloped roof in revit modify the footprint sketch of the roof by selecting and specifying the slope defining edges of the roof. I am working in architecture 2010. To draw the first roof segment begin at the bottom left and trace the exterior edge of the south wall by selecting the left wall endpoint and the intersection of the south and far east walls.
In the drawing area angle icons identify which lines of the sketch define slope. To draw the first roof segment begin at the bottom left and trace the exterior edge of the south wall by selecting the left wall endpoint and the intersection of the south and far east walls. Revit architecture forum trim wall from roof. In the drawing area highlight the west wall.
On the options bar for overhang enter 3 and clear defines slope. On the options bar for overhang enter 3 and clear defines slope. Create roof lines with an overhang. In the drawing area highlight the west wall.
When a dashed line is displayed on the exterior of the wall click to place the roof line. Create roof lines with an overhang. When editing the roof sketch select the edge or edges you would like to slope and select defines slope on the options bar. On the draw panel click pick walls.
On the draw panel click pick walls. Try using attach tool and attach the wall to the roof. I tried it in several ways but it will.

Revit How To Create A Profile And Wall Sweep In 2020 Wall How To Plan Sweep

Revit Tips Spanish Roof Adaptive Insane Version Revit Tutorial Autocad Revit Revit Architecture

Struggling To Create The Perfect Roof This Guide Will Teach You How To Control Roof Slope How To Create A Dormer And Man In 2020 Roof Repair Roof Roofing

Revit Conceputal Massing 04 Wall Roof By Face Revit Tutorial Autodesk Revit Mass

Trapezoidal Wall Cladding Wall Cladding Cladding Revit Architecture

33 Luxury Garden Roof Plan Revit Revitcity In 2020 Roof Plan Luxury Garden Roof Design

Creating Walls That Follow Site Topography Contours In Revit

Modeling A Tensile Fabric Roof In Revit Building Information Modeling Architecture Program Revit Architecture

Parapet 0033441 Png 420 386 Metal Cladding Roof Detail Curtain Wall Detail

Pin By Mickoloy Wellington On Architectural Detail Roof Structure Architecture Details Parapet

Trim Interscting Roofs Autodesk Community Revit Products

Revit Architecture Roof By Footprint Bimscape Roofing Fibreglass Roof Roof Design

Roof Truss Systems Roof Trusses Roof Truss Design Truss Structure

Assignment 4 Center Square Curtain Walls I Revit Architecture With Images Revit Architecture Architecture Curtain Wall

Autodesk Revit Tutorials 05 Adding The Roof Revit Tutorial Autodesk Revit Revit Architecture

Revit Architecture 2011 Beginners Tutorial 4 Windows Doors Wall Assembly Via Youtube Revit Architecture Revit Tutorial Architecture

Autodesk Revit Structural Detailing 2019 Tutorial Modern Architecture Interior Revit Architecture Modern Architecture

Curtain Wall Mullions And Join Conditions Revit Architecture Revit Architecture Architecture Curtain Wall
Https Encrypted Tbn0 Gstatic Com Images Q Tbn 3aand9gctknwcvuyxeoedzm34cwv4vzw Q6 U0mpwpdw Ezzfrmbzjg Eg Usqp Cau

Autodesk Previews Enhancements For Advance Steel And Steel Connections For Revit At Nascc 2017 Bim And Beam Steel Design Steel Metal Words

Eave Returns Interpreting Gyhr Details Thisiscarpentry Gable Roof Design Roof Design Roof Detail

Love This Guys Work Think We Need To Hire Him To Do Conceptual Drawings Roof Truss Design Roof Design Roof Framing

Revit Architecture Creating Roofs And Floors Lesson 2 Revit Architecture Revit Tutorial Roof Shapes

Energy Efficient Revit Construction Details Energy Efficient Construction Detailed Drawings Architecture Details

Trim Wall Top With Ref Plane Autodesk Community Revit Products

Revit Tutorial Understanding Your Roof Eaves Soffits Therevitkid Com Tutorials Tips Products And Information On All Revit Tutorial Roof Eaves Roof
Revit 1 7 Roofs Hip Gable Dormer Revit Tutorial Revit Tutorial Dormers Ceiling Plan

Revit To Indesign Indesign Bim Diagram

Revit Tutorial Shed Roof High Eave Detail Therevitkid Com Tutorials Tips Products And Information On All Things Rev Revit Tutorial Shed Roof Tutorial

Pin On Revit

Revit 2 1 Mass Modelling Intro Revit Tutorial Intro Youtube Intro

Pin On Details

Solved Single Wall Attach To Two Roofs Autodesk Community Revit Products

2 Revit Curtain Panel Pattern Based Arabic Revit Tutorial Brick Patterns Autocad Revit
Revit Roof Tip 8 Set Variable Material For Sloped Insulation Youtube

Best Way To Cut Roof Autodesk Community Revit Products

Revit Project Templates Provide A Beginning Environment And Standards For New Projects And Proj Building Information Modeling Revit Architecture Revit Tutorial

The Page Cannot Be Found Architecture Details Baseboards Architecture

Quad Lock Insulated Concrete Forms Better Buildings Building Design Architecture Details Insulated Concrete Forms

Public Library Archworks Pc Caitlin Daly Archinect Roof Detail Construction Drawings Roof Architecture

Pin On Revit

Creating An In Place Mass Wall Workout Revit Family Create

