Revit Roof Cut Off With Flat Plane

Solved Why Can T I Make This Roof Autodesk Community Revit Products

Roof Cutoff Level Youtube

Solved Roof Cutoff Not Cutting Off Autodesk Community Revit Products

Problem With Roof Planes Connection Autodesk Community Revit Products
How To Cut A Hole To A Roof Revit Lt 2018 Autodesk Knowledge Network

Solved Cannot Select Roof Edge Autodesk Community

If you d like to learn everything about revit roofs you may be interested in my revit roofs masterclass course.
Revit roof cut off with flat plane. On the properties palette specify a cutoff level and then specify a height for cutoff offset. Select the reference plane. Tutorial agenda creating a. If you found t.
Select the beam to be cut. When you set a cutoff level for a roof sometimes the cut orientation is vertical perpendicular to the cutoff level and sometimes it is horizontal parallel to the cutoff level. Click modify tabgeometry panelcut drop down cut geometry. The back clip plane is defined by the view depth parameter which is.
The roof by footprint tool is used for both flat and sloped roofs. Use the cut geometry tool to cut a structural member with a plane. To cut a beam at a wall create a reference plane in the plane of the wall where you want the cut to occur. Sketch the new roof on top of the existing roof.
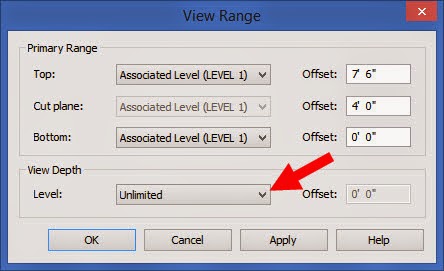
Products and versions covered. You activate this feature using the depth clipping parameter for the plan view. For example use cut geometry to cut a column to a certain height or to stop a beam at a wall. You notice when placing revit component families some display above the view cut plane while others like specialty equipment do not.
To cut off a roof in order to sketch another roof on top of it select the roof in the drawing area. Get this revit file here. If you only want the wall visible in the plan view as it appears in the view range of level 3 you can clip the wall from view using the depth clipping parameter. Use the depth clipping parameter to display parts of a model below the cut plane.
This property specifies the distance above or below the level at which the roof is cut off. This video shows you how to add a split line and a point to a flat roof so that you can edit the roof to allow for drainage channels gulleys. In this revit architecture tutorial i ll show you how to use it to create both roof types flat and sloped.

Revit Architecture Roof By Footprint Bimscape

Special Mansard Roof Autodesk Community Revit Products

Solved Roof Window Not Being Cut In Plan View Autodesk Community Revit Products

Solved Length And Width For Parts From A Roof Autodesk Community Revit Products

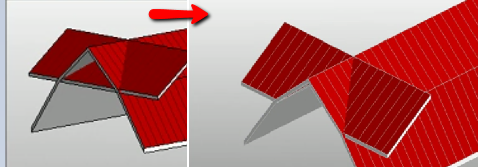
Solved Roof Joining Problems Autodesk Community Revit Products

Revit Roofs 8020 Bim

Revit Roof Basics 04 Intersect By Roof Join Cadclips Youtube

Shed Roof Square Cut At Top Edge Please Help Autodesk Community Revit Products

Revit Architecture Roof By Extrusion Bimscape

Revit Tutorial Understanding Your Roof Eaves Soffits Therevitkid Com Tutorials Tips Products And Information On All Revit Tutorial Roof Eaves Roof

Revit Purlins 8020 Bim
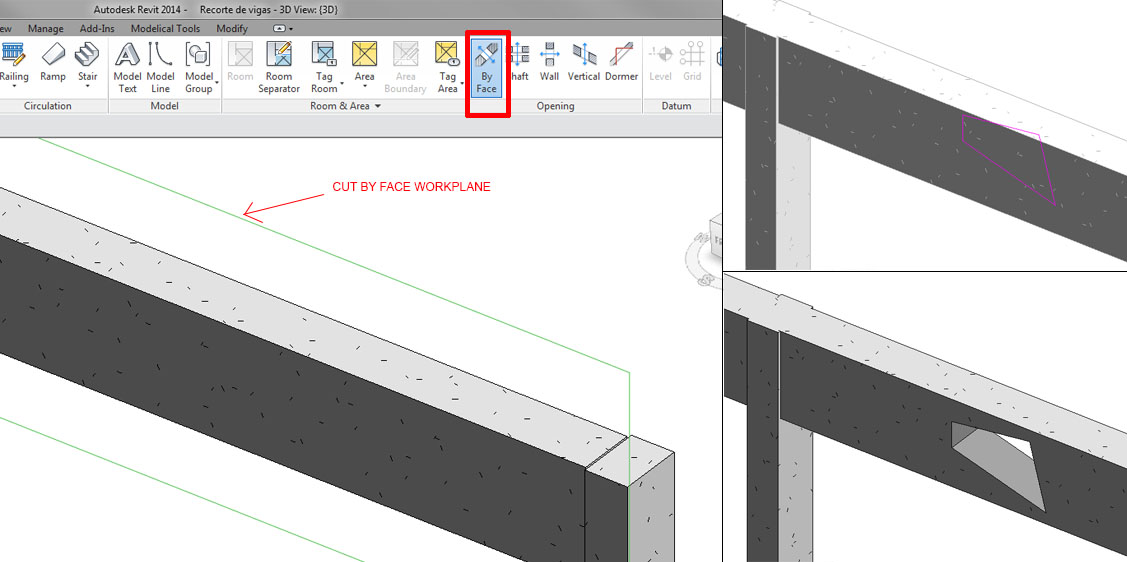
Cut Beams And Columns In Revit Modelical

Revit Tutorials Roofs Youtube

Revit Structure Best Practices Modelical

Revitcity Com Barrel Tile Roof By Extrusion

Five Minutes Of Roof Sloping Roof Slopes

Ribbon Roof Epilogue Telas
Inside The Factory February 2010
Https Encrypted Tbn0 Gstatic Com Images Q Tbn 3aand9gctd Knwg9 Aqvxobeiwrmo Ycxevyvqv5dpu08wjq Qygicqy3m Usqp Cau

Arraying Roof Shades Custom Families And Parameters In Revit 2016 Black Spectacles Youtube

Revit Roof Family

Trim Interscting Roofs Autodesk Community Revit Products

Raising The Roof Creating Roofs In Revit David Cohn Pdf Free Download

Solved Roof Unable To Join Misses Target Autodesk Community Revit Products

Revit Roof Tip 1 Remove Slope To Create Flat Roof Youtube
Revit Tips Creating Rafters With Beam System Youtube

Pin En Revit

Different Roof Types In Revit I Done In Revit Shed Roof Dome Type Roof Galvanized Roof Basic Roof Cool Roof Shed Roof Galvanized Roofing

Common Types Of Roofs How To Model Them In Autodesk Revit Agacad

Solved Hyperbolic Paraboloids Roof Autodesk Community Revit Products

Building Pad Confusion Autodesk Community Revit Products

Revit Roof Tip 6 Add Vertical Or By Face Opening Youtube

Revit Keyboard Shortcuts Vert Keyboard Shortcuts Revit Tutorial Autocad Revit

Tips And Tricks To Make Your Revit Drawings And Presentations Look Great Autodesk University
Hok Bim Solutions Troubleshooting Underlays In Revit

Parametric Shaded Walkway Parevitism Revit Gigabidea Revit Architecture Building Information Modeling Parametric Architecture

16 Capital Glass Roofing Lobby Ideas Roof Repair Roof Architecture Revit Tutorial

Creating An In Place Mass Wall Workout Revit Family Create

About Editing Floor And Roof Shape Revit Products Autodesk Knowledge Network

Revit Tip Floor Plan And Ceiling Plan View Range Explained Therevitkid Com Tutorials Tips Products And Informati Ceiling Plan Floor Plans How To Plan

Revit Tutorials 8020 Bim

3d Path Sweep Autodesk Community Revit Products

