Revit Extend Roof To Wall

Cannot Join Walls To Roof In A Proper Way Autodesk Community Revit Products

Split Gable Roof Autodesk Community Revit Products
Revitcity Com Wall To Roof Join Issue

Slop Bottom Of Wall Autodesk Community Revit Products
Revitcity Com Difficulty With Wall And Roof Ends

Attach Top Base Can T Keep Wall And Roof Joined Autodesk Community Revit Products
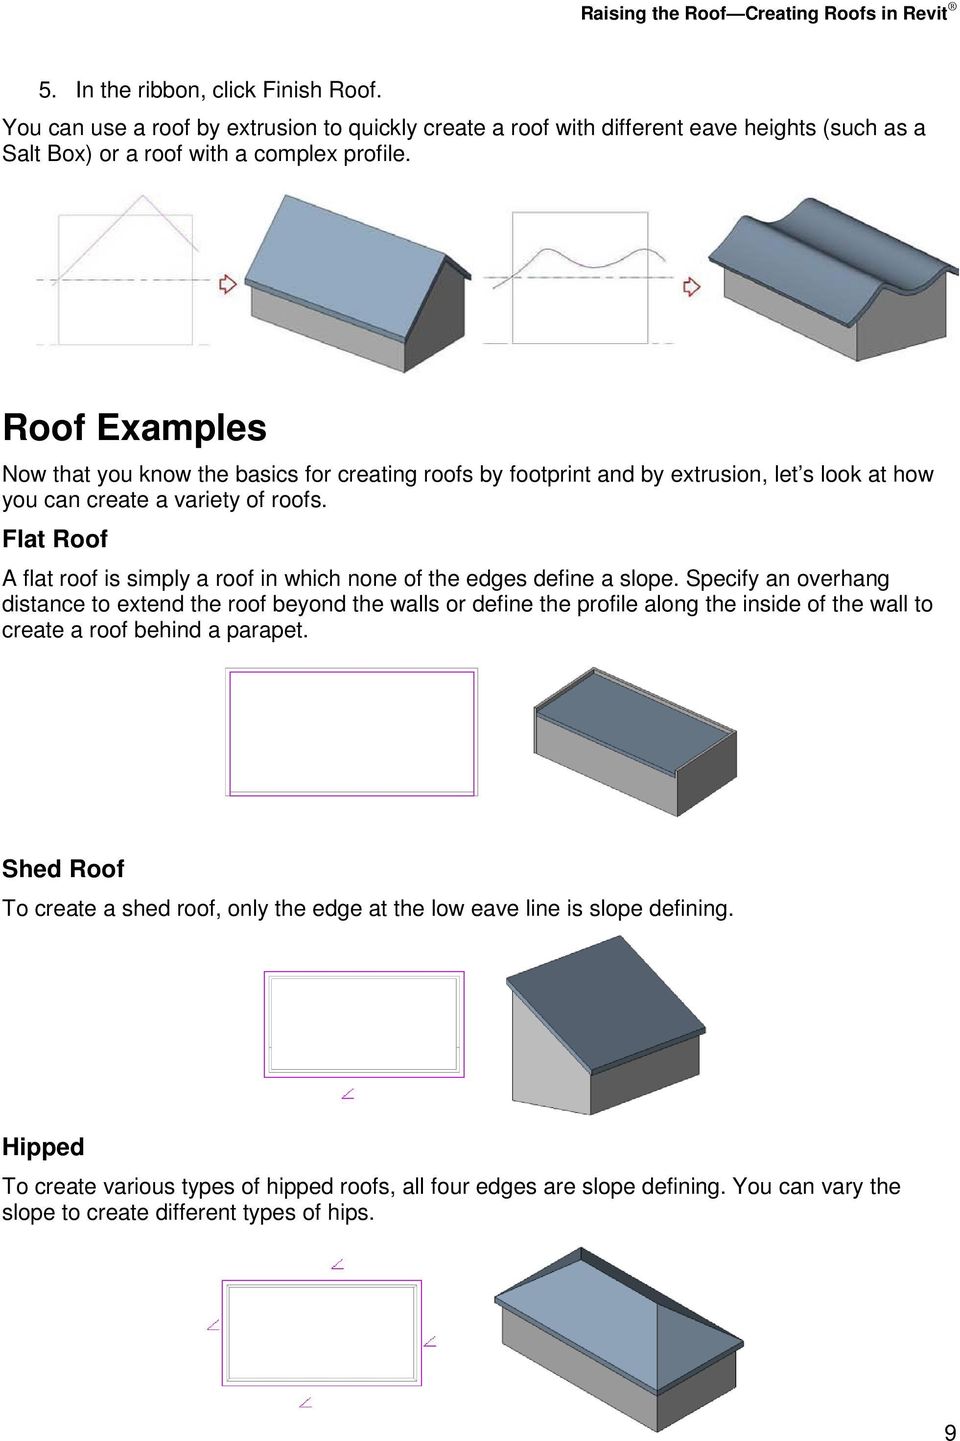
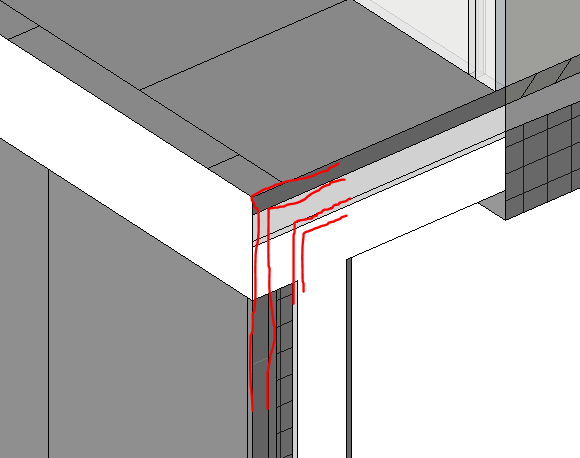
By attaching a wall to another element you avoid the need to manually edit the wall profile when the design changes.
Revit extend roof to wall. After placing a wall you can override its initial top and base constraints by attaching its top or base to another element in the same vertical plane. Make sure to set the view detail level to fine to see all the layers. In the example below we have an exterior wall and an interior wall. This tool is located in the modify tab.
When you select the roof face roof shape handles display. Shape handles are not available for surfaces created by openings placed in roof faces. 4 core boundary extend to structure 1 materials. Drag the shape handles to extend the roof.
Use it to extend the dormer roof to the main roof. To create a dormer model required walls and additional roof. When using a complex wall type with multiple layers the materials inside the core boundary will extend to the material with the structure 1 function. The other element can be a floor a roof a ceiling a reference plane or another wall that is directly above or below.
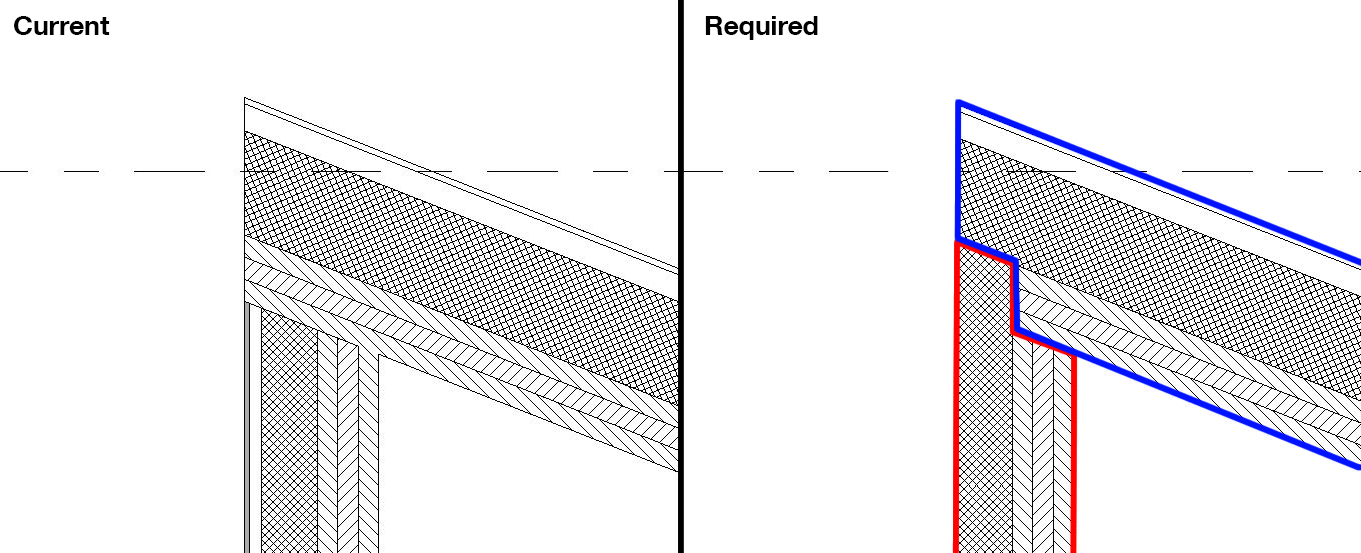
If you re new to revit you may be interested in my beginner s guide to revit architecture 84 part video tutorial training course the course is 100 free with no catches or exclusions. Instructor if you look closely at the wall underneath this roof you ll notice that it doesn t extend up to the roof so we need to correct that hold down the control key and click on this surface to select it and then move that up in the blue direction until the wall penetrates through the roof it doesn t have to go all the way but at least somewhat press escape. Then follow these 2 steps. Shape handles are available for all non horizontal side surfaces.
Just enjoy the course and drop me line if you found it useful. In the drawing area select the roof face.

Wall Roof Joint Autodesk Community Revit Products

Solved Attaching Wall To A Roof Problem Autodesk Community Revit Products

Solved Gable Roof Edit Question Autodesk Community Revit Products

Revit House 09 Extending Walls To Roof Youtube
Revitcity Com Controlling Roof And Wall Joins In Revit 2009
Revitcity Com Roof Wall Core Problem

Solved Recessed Roof Extending Into Wall Autodesk Community Revit Products

Https Encrypted Tbn0 Gstatic Com Images Q Tbn 3aand9gcqdhfa1qxay7d0gldcaebjrhaab5v Ikcctva Usqp Cau

Solved Walls Not Attaching To Roof Created By Selecting Faces Of Mass Autodesk Community Revit Products

Solved Why Do Roofs Cut Walls When Joined Autodesk Community Revit Products

Revit Tutorials Roofs Youtube
Video Create A Dormer Revit Products 2019 Autodesk Knowledge Network

Solved Select Walls In Roof Plan To Attach To Roof Autodesk Community Revit Products

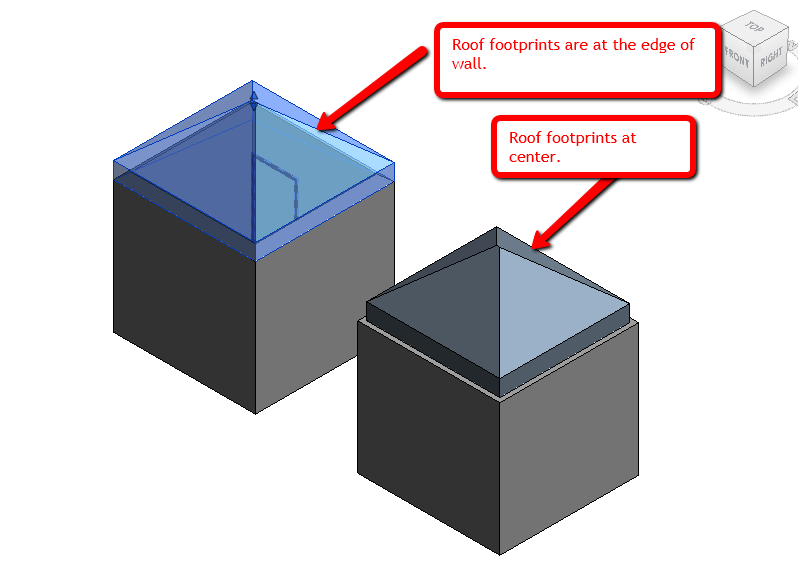
Roof Boundary Definition And Construction Settings In Revit Models Agacad

Eave Detail Continuous Insulation Finish Autodesk Community Revit Products

Solved Walls Not Attaching To Curved Roof Autodesk Community Revit Products

Revit Roof Basics 04 Intersect By Roof Join Cadclips Youtube

Solved How To Adjust Top Extension Distance For Wall That Is Aligned With Roof Ref Pl Autodesk Community Revit Products
Https Encrypted Tbn0 Gstatic Com Images Q Tbn 3aand9gctudq22impgrdhtxnihpgzuee4ndescvqietagjnphrfczd5y6r Usqp Cau

Solved My Gable Wall Won T Attach To The Top Of The Roof Autodesk Community Revit Products

Solved How To Do A Double Gable End In Revit Autodesk Community Revit Products

Extend The Roof Face Revit Products 2016 Autodesk Knowledge Network

Solved Roof Overhang Option Not Available For Some Roofs Autodesk Community Revit Products

Corrugated Roof And Wall In Revit A How To Guide Youtube

Solved Roof Plan Questions Autodesk Community Revit Products

Walls Are Not Visible In Floor Plan Autodesk Community Revit Products

Attach Wall To Roof Autodesk Community Revit Products

Solved Exterior Walls And Roofs Autodesk Community Revit Products

Solved How To Create A Parapet In Revit Autodesk Community Revit Products
Traditional Roof Construction N Revit Tutorial Youtube

Adding Roof Edge Dormers Revit Tutorial Lynda Com Youtube

Engineer Civil Revit Jeffery J Jensen Wiki
9 Tips To Understand Revit Roofs Youtube

Overhangs And Wall Thicknesses In Revit Best Cad Tips

Solved Joining Vaulted Ceiling Component To Walls Autodesk Community Revit Products

Part 5 Create A Roof Revit Products 2020 Autodesk Knowledge Network

Attach Walls To Other Elements Revit Lt Autodesk Knowledge Network

Solved Roofs Page 2 Autodesk Community Revit Products

3 Complex Roof Shapes In Revit Youtube

Revitup Gambrel Roofs In Revit

Part 5 Creating A Roof Revit Lt Autodesk Knowledge Network

Magnet Collage Remodeling In Autodesk Revit Using Families Topcon Positioning Systems Inc