Revit Cut Roof At Height
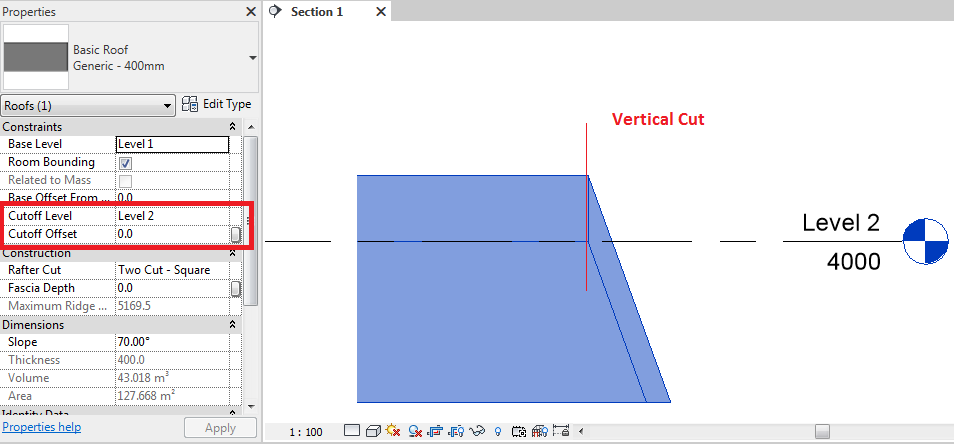
Cutoff Level Roof Behavior In Revit Revit Products 2018 Autodesk Knowledge Network

Revit Tutorials Roofs Youtube

Revit Tips Spanish Roof Adaptive Insane Version Revit Tutorial Autocad Revit Roof

Trim Interscting Roofs Autodesk Community Revit Products

Create Roof Trusses With Purlins In Revit Roof Trusses Roof Truss Design Roof

Roof Cutoff Level Youtube
For two cut plumb and two cut square specify a value for fascia depth between zero and the thickness of the roof.
Revit cut roof at height. The cut plane is a plane that determines at what height certain. After creating a roof you can adjust the height of the eaves. Read it if you need more. On the properties palette specify a value for offset from roof base or plate offset from base.
In this tips tricks we are going to cover how to create a mansard roof you may not have noticed this before but revit has the ability to cut a roof at a pre set height. While in sketch mode select a slope defining boundary line. The top and bottom clip planes represent the topmost and bottommost portion of the view range. In the drawing area select the roof.
The default is plumb cut as we have seen in the previous images. Revit gives us three options. Click finish edit mode. This image was snipped from revit help about view range.
The floor plan cut the model at elevation 1200 mm but the windows sill height are at 1700 mm. Every plan view has a property called view range also known as a visible range. The roof tool in revit is a very simple tool to use but you can get some very complex and interesting roof designs from it. The view range is a set of horizontal planes that control object visibility and display in the view.
So i need the cut plane at the elevation more than 1700. After creating a roof change the style of the eaves by specifying the rafter cut. If you are not familiar with view range this image can help to set the options above. Rafter cut additional options in revit have to do with the termination of the rafters at the eaves.

Revit Conceputal Massing 04 Wall Roof By Face Revit Tutorial Autodesk Revit Mass

Solved Joining Roofs Higher Roof To Lower Roof Autodesk Community Revit Products

Revit Tutorial Understanding Your Roof Eaves Soffits Therevitkid Com Tutorials Tips Products And Information On All Revit Tutorial Roof Eaves Roof

Revit Roof Basics 04 Intersect By Roof Join Cadclips Youtube

Trapezoidal Wall Cladding Wall Cladding Cladding Revit Architecture

Revit 2019 Offset Clerestory Roof Youtube

View Range Revit Products Floor Plans Revit Architecture Revit Tutorial

Roof Truss Systems Roof Trusses Roof Truss Design Truss Structure

How Do I Get A 90 Degree Roof Edge On A Shed Roof Autodesk Community Revit Products

Pin On Revit

9 Tips To Create Beautiful 3d Views In Revit Views Beautiful Pure Products

Solved Length And Width For Parts From A Roof Autodesk Community Revit Products

Revit Roof Tip 9 Join Roofs Add Opening To Create Dormer Youtube In 2020 Dormers Tips Lettering

All Tutorials Farnsworth House Roof Detail Architecture Details

3 Complex Roof Shapes In Revit Youtube

Revit Tips Easy Farm Fence By Dynamo With Family Download Youtube Farm Fence Backyard Fences Fence Landscaping

Revit Architecture Roof By Footprint Bimscape

Pin On Revit Architecture Tutorials
Https Encrypted Tbn0 Gstatic Com Images Q Tbn 3aand9gcqt Jag1pa Hofhz 59fqg8i0feamtfelr0xlmsrdq6chiqvxbg Usqp Cau

Solved Roof Doesn T Meet Autodesk Community Revit Products

Pin On Wood

Plan Region In Stairs Jpg 575 378 How To Plan Stairs Architecture Plan

Revit Structure Tutorial Filtering A Selection Lynda Com Revit Tutorial Tutorial Filters

How To Revit Presentation Floor Plans Www Revitgenie Com Revit Architecture How To Plan Revit Tutorial

Solved What Floor Plan Does A Roof Get Drawn On First Or Second Autodesk Community Revit Products

Https Encrypted Tbn0 Gstatic Com Images Q Tbn 3aand9gcsypmpackojihknncgufnonxuep0e5w Gu 8a Usqp Cau

Exterior Rendering Using Artificial Lights At Night Youtube Exterior Rendering Night Light Exterior

Revit Tips Join Roof Dormer Opening Youtube

Cadclip Revit 2014 Electrical Power Lighting Wiring And Circuits Diy Electrical Autocad House Wiring

Rb Bedste Window Family Tutorial Youtube In 2020 Revit Tutorial Revit Architecture Windows

Revit Parametric Stacker Door 3d Model Stacker Doors Revit Tutorial Parametric

Pin On Details

Revit Rough Width Height System Parameters System Rough Height

Pin On Dynamo Revit
Revit Roof Tip 8 Set Variable Material For Sloped Insulation Youtube

Design Collaboration For Aec Bim 360 Design Autodesk Building Information Modeling Bim Revit Architecture

Download Free Revit Families And Bim Content Rfa Projeto Arquitetonico Completo Bim Blocos Revit

About Editing Floor And Roof Shape Revit Products 2020 Autodesk Knowledge Network

Study Sun Angles In Revit Google Search Sun Diagram Diagram Architecture Study Architecture

Revit Roof Eave Detail Google Search Roof Overhang Orinda Roof

Solved Join Roof Issue Autodesk Community Revit Products

Revit Roof Cleaning Up Overlapping Roofs Youtube

