Revit Attach Curtain Wall To Roof
Solved Curtain Wall Roof Autodesk Community Revit Products

Revit Adding A Curtain Wall On A Floor Or Roof Cadtechseminars Com Youtube

How Can I Attach A Curved Curtain Wall To A Sloped Roof Autodesk Community Revit Products

Vitral A74 Roof Glazing As Bim Object For Revit Youtube

Revit Sloped Glazing Youtube

Parapet 0033441 Png 420 386 Metal Cladding Roof Detail Curtain Wall Detail

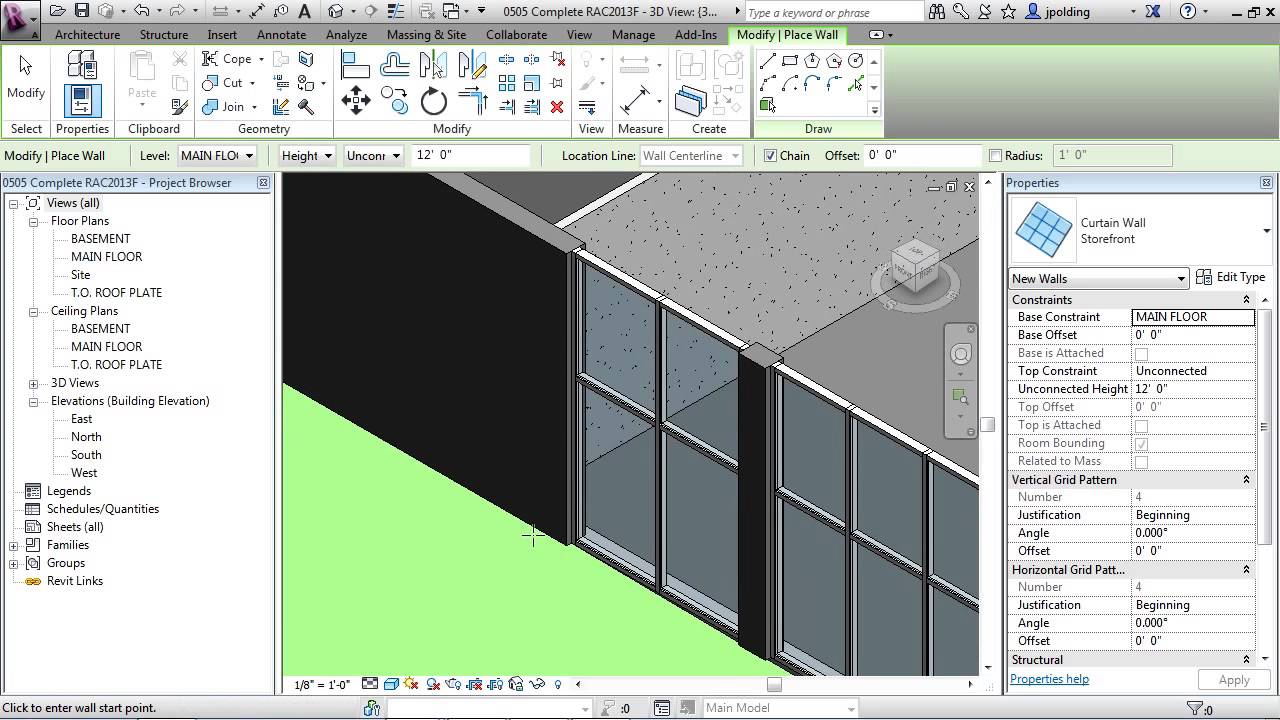
Click modify walls tab modify wall panel attach top base.
Revit attach curtain wall to roof. Use the type selector to select a curtain wall type to place. There are many ways to add duct in re. To attach a truss 1 verify that roof and structural floor visibility is turned on in the current view. To detach walls from other elements.
These walls have a glass icon next to them. Curtain walls can be placed into the project using the wall tool. 2 select one or more trusses to attach. 3 fill an empty curtain wall with grids.
This video covers the basics of adding ductwork in your projects. Select the elements to which the wall will attach. On the options bar for attach wall select either top or base. In particular connecting diffusers to the main duct.
The 3 point arc tool is selected from the draw panel and an arc shaped wall is added at the entry. This video looks at how to use the shift key and view the cube to examine the model. Select the wall tool in the architecture tab. We are adding a curtain wall to the entry so the top constraint is set to 3000 mm in the properties palette.

Image Result For Metal Stud Curtain Wall Section Rigid Insulation Metal Panels Curtain Wall

Solved Curtain Wall Joining To Roof Issue Autodesk Community Revit Products

Revitcity Com Connecting Slope Glaze Roof To Curtain Walls Part Ii

Curtain Wall Connections Curtain Wall Detail Curtain Wall Wall Section Detail

Curtain Wall To Sloped Curtain Wall Autodesk Community Revit Products

10a Curtainwall13 Jpg 721 413 Curtain Wall Detail Glass Facades Curtain Wall

Change Curtain Wall Glazing Type Autodesk Community Revit Products

Handle The Roof On Your Home Like A Pro With These Tips Roofing Roof

Javiervelo Architecture Details Revit Architecture Roof Detail

Revit Architecture How To Add Curtain Walls Lynda Com Tutorial Youtube

Pin By Katie Kangas On Architecture Details Curtain Wall Detail Curtain Wall Glass Curtain Wall

Curtain Wall Head Detail Diagram Architecture Architecture Presentation Architecture Drawing

Award Beukenhof Crematorium And Auditorium Roof Detail Glass Roof Architecture Details
Revit Architecture 2013 Tutorial Curtain Walls Youtube

Technical Data Rodeca Gmbh Pergola With Roof Polycarbonate Panels Polycarbonate

Allow The Glazed Window Panel For Curtain Walls To Attach To Sloped Elements Autodesk Community

Tricky Triangular Curtain System Autodesk Community Revit Products
Revit Project Templates Provide A Beginning Environment And Standards For New Projects And Proj Building Information Modeling Revit Architecture Revit Tutorial
1

How To Create An Quot Organic Geometry Quot Form In Revit And Attach Walls Floors And Curtain Systems To It So Organic Shapes Autodesk Revit Full Tutorials

Solved Revit Curtain System Grid Problem Autodesk Community Revit Products
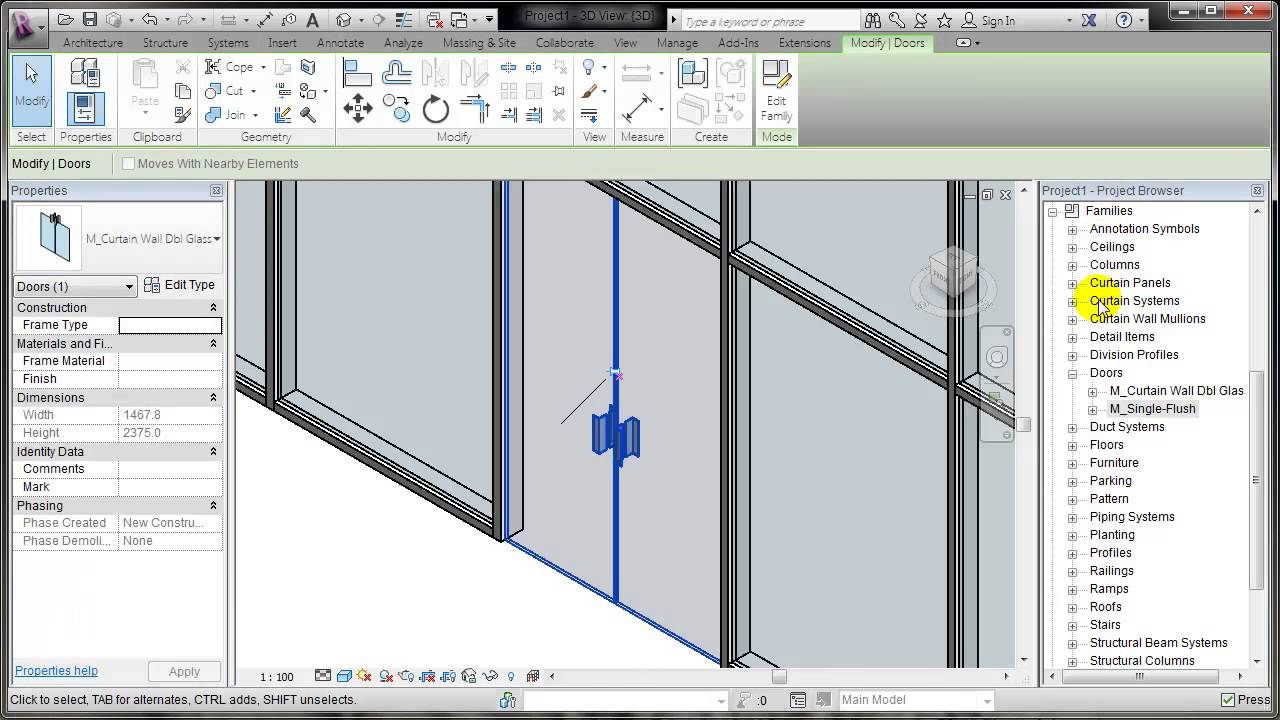
Revit Placing A Door In A Curtain Wall Youtube

Curtain Wall Termination At Base Level Curtain Wall Detail Curtain Wall Glass Curtain Wall

Glass Facade Structure Tim Với Google Glass Facades Glass Roof Glass Building

Solved Greenhouse Style Curtain Wall Best Way Autodesk Community Revit Products

Traditional Waterproofing Plane Concrete Roof Google Search Parapet Roof Cement Roof

How To Autodesk Revit Attach Walls To Curved Ramp Autodesk Revit Revit Tutorial Autodesk

Architectural Technology 5 Columbia Abstract Structure Architecture Facade Design Architecture Details

Upgrade Revit Families And Files To 2014 Quick And Easy Design Suites Upgrade Content Upgrade

Corner Glazing For Revit Curtain Walls Revit Architecture Wall Curtain Wall

Five Minutes Of Roof Sloping Roof Slopes

Solved How To Align A Line In Edit Profile Mode To A Sloped Plane Autodesk Community Revit Products

Revit Tips Curved Curtain Wall Youtube Building Information Modeling Revit Tutorial Revit Architecture
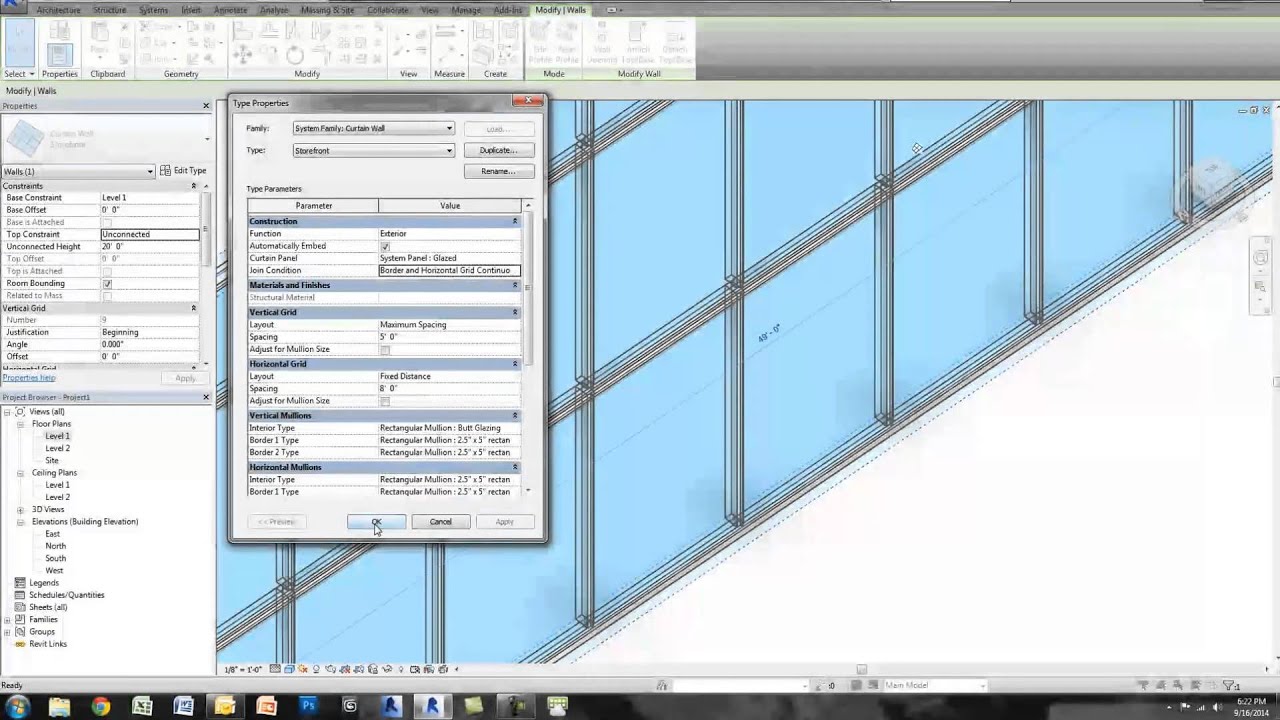
Revit Tutorial Create Butt Glazing In A Curtain Wall Storefront Youtube

4 Thrilling Ideas Lace Curtains Layered Nursery Curtains Ikea Different Curtains Styles Country Shower Curtains Short Curtains Bay Farmhouse Curtains Shabby Chic Curtains Elegant Curtains

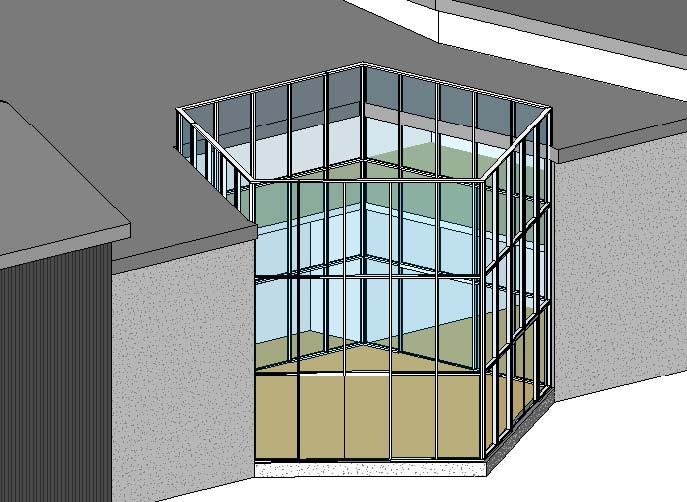
Revit Curtain Walls Meeting In Corner Youtube

Https Www Aiachicago Org Dea Archive 2015 Westfield Old Orchard Glass Cube Glass Roof Facade Design Architecture Glass

Revit For Mep Electrical Lighting Systems Circuits Switches And Annotation Lighting System Architecture Presentation Switches

Use Of Steel In Cladding Systems Cladding Systems Cladding Curtain Wall Detail

Detail Jpg Metal Facade Perforated Metal Metal Cladding

Therevitkid Com Tutorials Tips Products And Information On All Things Revit Bim Revit Architecture Architecture Design Parametric Architecture

Cadclip Revit Waffle Coffered Ceiling Youtube

